Thursday, June 27, 2013

Newborn Bear Hat Pattern.

Hey y'all!
   I had some brown yarn that I didnt know what to do with so I decided to make a teddy hat with earflaps!! :) This pattern is only for a newborn baby, but I will provide the sizes for children, teens, and adults as soon as I can. Here is the hat:

Pattern

Materials

  • One ball of brown yarn
  • Size 6.0mm crochet hook
  • Tapestry needle
Hat Pattern:
    R1: Ch 4 and join with a sl st to form a ring. ch 3, and then 10 dc into the ring. Join to the ch 3 with a sl st. (10sts)
    R2: Ch 3, and then 2dc into every st around. Join to the ch 3 with a sl st. (20sts)
    R3: Ch 3, [ dc1, 2dc into the next st]. Repeat the pattern in the brackets around. Join to the ch 3 with a sl st. (30 sts)
    R4: Ch 3, [ dc 2, 2dc into the next st]. Repeat the pattern in the brackets around. Join to the ch 3 with a sl st. (40 sts)
    R5-R8: Dc in every st around. (40 sts)
       (Do not bind off)
Earflap 1:
   ( REMEMBER TO CH 1 AND TURN BEFORE EACH ROW!! :P)
    Row 1: Sc 8 sts.
    Row 2: Dec, sc 4, dec
    Row 3: sc in each st across
    Row 4: Dec, sc 2, dec
    Row 5: Sc in every st across.
    Row 6: Dec 2
    Row 7: Dec
    Row 8: sl st.
     Loosely, ch 12 and BO with a tail that is about 1 inch long. (Do not weave in the tail!!!)

Earflap 2: Skip 12 sts, and then repeat the same pattern from Earflap 1. BO

Ears Pattern( Make 2 ears):
    R1: ch 2 and then 6 sc into the 2nd ch away from the hook
    R2: 2 sc in every st around
    R3: sc 1, 2 sc into the next st. Repeat around.
    R4-6: sc in every st around.
  BO with a long tail for sewing.

Finishing

  • Sew the ears onto the hat
  • Weave in loose ends


And there you have it!! I hope you enjoy this pattern. If you make the hat, please send me pictures of them!! Enjoy!

Anna out.


This pattern is an original pattern by Anna S. from Spool of Sunshine(June 2013). Please do not claim this pattern as your own. If you wish to share this pattern, you may link to this pattern but please do not reprint it on your site. You may keep a copy for your own personal use but you may not sell or distribute it, or sell items made from this pattern.



Wednesday, June 12, 2013

Granny Square Bag Pattern

Hey y'all!
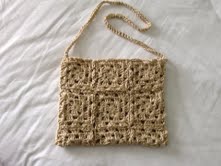
   I made lots of Granny Squares for a quilt that I was making at home, but I didn't want to carry all of those squares in my backpack when traveling on the plane. So, I quickly sewed them all together and made a sling bag! :)


Here is the free pattern:
 Materials

  • Caron Simply Soft in Bone
  • Size 4.25mm crochet hook
  • Yarn needle
Pattern
     Bag
make 15 Granny Squares and sew them together in 3 rows with 5 squares in each row.

It should look like this:
Fold the rectangle vertically, and then sew the sides together. 
Strap
ch 81/91.
Row 1: sc into the 2nd ch away from the hook. Sc in every ch across.
BO

Finishing

  • Sew the strap onto the sides of the bag.
  • Weave in loose ends. 


And there you have it!! Please send me pictures of the bags that you made form this pattern. Please do not take and sell this pattern as your own, and you may not sell that items that you made from this pattern or anything that I designed. Thank you!

Happy Crocheting!

Anna out.


This pattern is an original pattern by Anna S. from Spool of Sunshine(June 2013). Please do not claim this pattern as your own. If you wish to share this pattern, you may link to this pattern but please do not reprint it on your site. You may keep a copy for your own personal use but you may not sell or distribute it, or sell items made from this pattern.

Thursday, June 6, 2013

Small Heart Appliqué

Hey y'all!!
 I made this little heart this morning, and I wanted to share the pattern with you all. You can attach this heart to anything. Here is the pattern:

Materials

  • Worsted weight yarn
  • Size 5.5 mm crochet hook
  • Yarn needle. 
  • Scissors.
Heart Pattern
  Ch 4
R1: 2 dc into the 4th ch away from the hook, 2 sc into the center, 1 hdc into the center, 2 sc into the center, 2 dc into the center, ch 3, and then sl st into the center.
BO.

Finishing
Weave in loose ends.

And there you have it!! Here is what the heart should look like:

Anna out. 

This pattern is an original pattern by Anna S. from Spool of Sunshine(June 2013). Please do not claim this pattern as your own. If you wish to share this pattern, you may link to this pattern but please do not reprint it on your site. You may keep a copy for your own personal use but you may not sell or distribute it, or sell items made from this pattern.


Tuesday, June 4, 2013

Granny Circle Pattern!

Hey y'all!!

 The first thing that I want to say is, GREETINGS FROM TAIPEI, TAIWAN! :P  I made a Granny Circle and I wanted to share it with y'all!! :) Here is the pattern!

Materials:
Size 4.25 mm crochet hook.
Worsted Weight yarn.
Yarn Needle.

Special Stitches.
Granny Cluster: 3 dc into the same st.
Granny Shell: 3 dc into one st, ch 1, then 3dc into the same st.

Granny Circle:
Ch 5 and join to the first ch with a sl st to form a ring.

Rnd 1: ch 3, and then *Granny cluster, ch 1* into the ring. Repeat from * to * 5 more times. Join to the ch 3 with a sl st.
( It should look like this:
)

Rnd 2: Ch 3, and then *Granny shell, ch 1* into every ch 1 space. Repeat from * to * around. Join to the ch 3 with a sl st.
Rnd 3: ch 3, and then *Granny cluster* in every ch 1 sp around. Repeat from * to * around. Join to the ch 3 with a sl st.
    If you want, you can stop here. Your Granny Circle should look like this:

If you want you circle to be bigger then you can make it bigger by folowing the rest of the pattern:
 Rnd 4: ch 3, then *Granny cluster into the ch 1 sp, ch 1, then Granny Shell into the next ch 1 sp*. Repeat from * to * around. Join to the ch 3 with a sl st.
Rnd 5: ch 3, and then *Granny Cluster in every ch 1 sp.* Repeat from * to * around. Join to the ch 3 with a sl st.
BO. You Granny Circle should look like this:

Enjoy!! 

Happy Crocheting!!


Anna out. 


This pattern is an original pattern by Anna S. from Spool of Sunshine(June 2013). Please do not claim this pattern as your own. If you wish to share this pattern, you may link to this pattern but please do not reprint it on your site. You may keep a copy for your own personal use but you may not sell or distribute it, or sell items made from this pattern.