Showing posts with label crochet. Show all posts

Saturday, October 3, 2015

DIY Where's Waldo Costume

Halloween is coming up. Here is a cheap and quick last-minute costume!


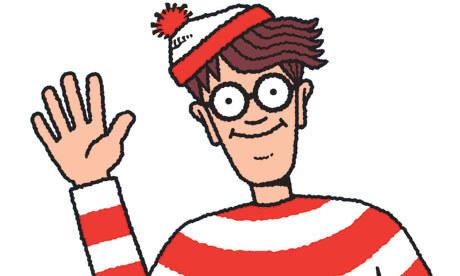
As a kid, I always loved the Where's Waldo books. Sometimes I would get frustrated at them because I could never find Waldo.:P
 (image found at google.com)


For Reformation Day, I wanted to be Waldo. I already had dark blue jeans, red and white striped t-shirt, brown shoes, and nerdy glasses. However, I did not have a red beanie. Since I did not want to buy a red beanie, I decided to make my own! I looked on Ravelry for some beanies but decided to make my own instead.

Using some red yarn from Red Heart, I began to make the hat:
I basically used the same pattern for my Easy Pom Pom Beanie which is from Lion Brand. Here's the link to the pattern!
I made a few adjustments and here is the new pattern I came up with:

Materials:
Red worsted weight yarn
6.00 mm crochet hook
Plastic needle

Beanie:
Ch 42
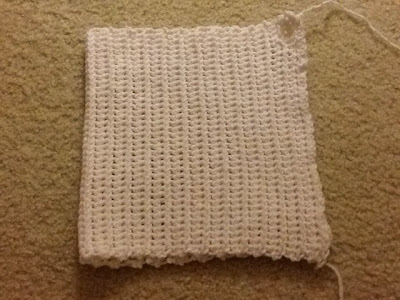
Row1: In the 3rd ch away from the hook, hdc. Hdc in every st across.
Row2- desired length: Ch2, turn, hdc in the BACK LOOPS ONLY in every st across.

BO with long tail for sewing.

Once you have your rectangle, fold it in half (Fold it so that the ribbed texture is vertical instead of horizontal)and sew the side opposite to the folded side to create a tube.


With a long strand of yarn of the same colour, thread around the top of the tube and pull tightly. If there is still a hole at the top, sew it together until the hole is closed.

Beanie done!

The beanie was quite long, so I folded the bottom up. I really like this beanie because I can either keep the bottom unfolded for the beanie to be slouchy, or I could fold it up to make it more like a standard beanie.

Here is a super easy and quick way to make a pom pom with just your hands!!
Wrap red yarn around your hand till it is super thick, tie a string in the center, and cut through the two loops.

After making the pom pom, I sewed it to the hat. Finished beanie:


Here are the other things you will need for the costume:
1. Red and white striped top
2. Dark blue jeans
3. Glasses
4. Brown/ Beige shoes


Tada! I am Waldo!


Have fun crafting and crocheting!
~Anna
This pattern is an original pattern by Anna S. from Spool of Sunshine(October 2015). Please do not claim this pattern as your own. If you wish to share this pattern, you may link to this pattern but please do not reprint it on your site. You may keep a copy for your own personal use but you may not sell or distribute it, or sell items made from this pattern.

Tuesday, January 28, 2014


I am very excited to introduce a new friend to y'all! Here is a sneak peek of a new amigurumi design! What do you think? The step-by-step blog post and pattern will be coming out very soon this week!  

Thursday, January 16, 2014

Giveaway!! Awwww Yeeeeaaaahhhhh!(CLOSED)

YAYY! A GIVEAWAY! As promised, here is the giveaway to celebrate my 1st Blogiversary!! :) These are the keychains that I will be giving away.
First, there is the lime green monster key chain,
Then, there is the chocolate brown monster key chain,
And finally, there is the orange monster key chain!
 Here are the rules and ways to enter:
The way to win one of them is to comment on the post. You have to comment on which monster is your favorite. The 3 winners will be chosen randomly. Here are the instructions:
  • 1. You must comment on this post.
  • 2. You cannot comment more than once.
  • 3. You must also give your email address when you comment.
  • 4. The deadline is  January 21, 2014.
  • 5. The winners emailed on January 22, 2014.

Please comment if you want one of these keychains!:)

Have a wonderful day of crocheting and crafting!
~Anna~

Sunday, January 12, 2014

Photoshoot with Nathalie Cheng!

I did a photoshoot with Nathalie and I wanted to share some of the pictures with y'all! :)
This is my long double crochet cowl. The pattern can be found at allaboutami.com
This is the sweetheart bunny. The pattern can also be found at allaboutami.com
Some monster nugget keychains I'm giving away soon. The pattern is by me! But I did not post it.
Spring bunny!! The pattern can be found at allaboutami.com
A teddy bear rattle for a baby! The pattern is by me but I have not posted it.
Teddy bear keychain. You can purchase it in my etsy shop at critterchains.etsy.com
Another teddy keychain in the shop.
A tiny latte keychain in the shop too!
An elephant keychain that is in the shop as well.


This is Mochi!! The pattern can be found at allaboutami.com


Thank you, Nathalie, for the pictures!! 

Her blog can be found at nathalieecheng.wordpress.com

Have a great day of crocheting and crafting!!

Anna❤️❤️

Saturday, December 28, 2013

Project~Easy Pom Pom Beanie

While I was watching the Wolverine with my dad and brother, I made this super cute hat!! :) I saw it on All About Ami's blog ,and I knew I HAD to make it. :)I made the long thick strip and folded it in half and sewed the side closed. I used my 6.0mm Clover Crochet hook.
Doesn't the hat have such a lovely ribbed pattern? :)
 I love the ribbed look of the hat. :) ❤️❤️


Then, I threaded a long strand of yarn around the circumference of the hat and tightly pulled the string which closed the hole. 
Then, I made a Pom Pom, sewed it to the top of the hat, and my hat was done!!!:) 
I love this hat... :) 
It looks super cute!
I wear this hat a lot. And it goes well with a LOT of my winter scarfs and jackets. :) Keep warm, y'all!!
The pattern can be found on the Lion Brand website, but you need an account to get the pattern. Luckily the registration is free!! :)

Have a great day of crocheting and crafting!! 
❤️anna❤️


Saturday, December 7, 2013

Simple Breezy Slouchy Hat

 Brrr! It's been pretty chilly where I live lately. :) It may even snow(it never snows where i live)! I made so many winter hats and scarfs, but this one turned out to be my favourite hat. I bought 2 balls of Vanna's Choice yarn in two different shades of grey, and I decided to make a beanie. The pattern is super easy and simple, and it can be adjusted easily too!

Materials

  • 2 balls of grey yarn in different shades( I used Vanna's choice yarn in Silver Grey and Charcoal Grey)
  • Size 6.oomm crochet hook( I used my clover hook)
  • Tapestry needle
Hat Band:
With the darker grey yarn:
Ch 8
R1: In the 3rd ch away from the hook, dc. Dc in every ch across.
R2: dc in the back loops only across.
Repeat R2 until the band will fit easily over your head.
BO and sew the ends together.
Hat Body:
With the lighter grey yarn:
Rnd 1: Attach the yarn to the brim of the band, and sc around the band.
Rnd2-20: HDC in every st around.
BO.

Finishing:
Cut a long strand of yarn and thread it through the top of the hat. Pull tightly to close the hole. Weave in loose ends.

And there you have it!! :) 

Have a great day of crocheting and crafting! 

~Anna~
This pattern is an original pattern by Anna S. from Spool of Sunshine(December 2013). Please do not claim this pattern as your own. If you wish to share this pattern, you may link to this pattern but please do not reprint it on your site. You may keep a copy for your own personal use but you may not sell or distribute it, or sell items made from this pattern.

Monday, December 2, 2013

Pattern: Amigurumi Fox

Let's make this cutie!! :) It is super easy and simple.

Materials
  • Orange, White, and a little bit of red yarn
  • Size 3.25 crochet hook
  • Stuffing
  • Little bit of black felt
  • Glue gun with glue sticks
  •  Size 12mm safety eyes
  • Darning Needle
Head
With Orange Yarn:
 Rnd 1: ch2 and 6sc into the 2nd ch away from the hook. (6sts)
 Rnd 2: 2 sc in every st around. (12sts)
 Rnd 3: {sc1 , 2 sc in the next st} repeat around. (18tsts)
 Rnd 4: {sc 2, 2 sc in the next st} repeat around. (24 sts)
 Rnd 5: {sc 3, 2 sc in the next st} repeat around. (30 sts)
 Rnd 6: {sc 4, 2 sc in the next st} repeat around.(36 sts)
 Rnd 7: {sc 5, 2 sc in the next st} repeat around.(42 sts)
 Rnd 8: {sc 6, 2 sc in the next st} repeat around.(48 sts)
 Rnd 9-12: sc in every st around. ( 48sts)
Switch to white yarn
 Rnd 13: sc in every st around. (48sts)
 Rnd 14: {sc 6, dec}repeat around.(42 sts)
 Rnd 15: {sc 5, dec} repeat around.(36 sts)
 Rnd 16: {sc 4, dec} repeat around.(30 sts)
Place safety eyes in between Rnd 12 and 13.  
 Rnd 17: {sc 3,dec} repeat around.(24 sts)
 Rnd 18: {sc 2, dec} repeat around.(18sts)
Stuff head.
 Rnd 19: {sc 1, dec} repeat around.(12 sts)
 Rnd 20: { dec} repeat around. (6sts)
Bind off with a long tail to close the hole. 

Body
With orange yarn:
Rnd 1: ch 2 and 6 sc in the second ch away from the hook.(6 sts)
Rnd 2: 2 sc in every st around. (12 sts)
Rnd 3: {sc 1,2 sc in the next st.} repeat around. (18 sts.)
Rnd 4: { sc 2, 2 sc in the next st} repeat around. (24 sts)
Rnd 5&6: sc in every st around.
Switch to white yarn
Rnd 7&8: sc in every st around. 
Rnd 9: {sc 2, dec} repeat around. (18 sts)
Bind off and stuff tightly.

Ears( make two)
With red yarn:
Ch 2
Rnd 1: 6 sc in the second ch away from the hook(6sts)
Rnd 2: 2sc in every st around(12 sts)
Rnd 3: sc in every st around. (12 sts)
Switch to orange yarn
Rnd 4: {sc 1, 2 sc in the next st} repeat around. (18 sts)
Rnd 5-7: sc in every st around
Bind off with a long tail for sewing.

Arms and legs( make 4) 
With white yarn
Rnd 1: ch 2 and 6 sc in the second ch away from the hook.(6 sts)
Rnd 2&3: sc in every st around (6 sts)
Switch to orange yarn
Rnd 4-6: sc in every st around. (6 sts)
Bind off with a long tail for sewing. 

Finishing
With black felt, cut a small triangle for the fox's nose and glue gun it to the fox's face. Sew the ears on the head without stuffing them. Sew the body underneath the head. Sew the arms onto the body. 
Weave in loose ends. 

And voila! Whew! It has been a while since I wrote an amigurumi pattern! :D 

Have a great day of crocheting and crafting!! ❤️❤️

❤️Anna
This pattern is an original pattern by Anna S. from Spool of Sunshine(December 2013). Please do not claim this pattern as your own. If you wish to share this pattern, you may link to this pattern but please do not reprint it on your site. You may keep a copy for your own personal use but you may not sell or distribute it, or sell items made from this pattern.

Sunday, November 24, 2013

Amigurumi Fox

It's finally done! after like 2 months of working on the pattern, I finally completed it!!! This has got to be my favourite amigurumi design! :)
Side view!
He is very small, and he would make an amazing gift as a desk pal! :) 

The pattern will be up very soon. I just have to type it out. :P 

Until then, happy crocheting and crafting!
❤️Anna 


Wednesday, November 6, 2013

Sweet Heart

Isn't this such a cute heart? :) I got the pattern from Ravelry and downloaded the pattern onto my iPad. The Ravelry pattern can be found here: http://www.ravelry.com/patterns/library/crochet-heart-motif-1.

The heart turned out bigger than I expected since i used a D hook. I ❤️ Clover hooks!!

Here are the supplies I used. I crocheted the heart with Loops and Threads Impeccable Solids in Arbor Rose and a D Clover Crochet Hook.
That's all for today!

Have a wonderful day of Crafting and Crocheting!! 
❤️anna❤️

Saturday, October 19, 2013

What Yarns Do I Use?

Well, a reader of my blog named Haley commented on one of my posts asking me what kind of yarn I crochet with. I crochet with all different types of yarn! :) I have soooo many favourites! When I had time, I made a small list of my favourite yarn brands:

  • Lion Brand Vanna's Choice ( worsted weight yarn)
  • Lion Brand Cozy Wool ( Chunky yarn)
  • Patons Grace ( mercized cotton yarn)
  • Lily Sugar n' Creme (cotton yarn)
  • Loops and Threads Impeccable Solids (Worsted weight yarn)
  • Red Heart Soft Yarn ( Worsted Weight Yarn)
  • Red Heart Super Saver Solids. (Worsted weight yarn)

I like to crochet scarfs, hats, bags, and other useful items with Lion Brand Vanna's Choice yarn. I highly recommend that you do not use this yarn when making amigurumi because this yarn fuzzes easily.

With the Lion Brand Cozy Wool, I like to crochet only slouchy hats and scarfs with that yarn. I NEVER use chunky yarn to make amigurumi because chunky yarn is way too thick for my 2.00 mm crochet hook.

I love Patons Grace yarn! I use it to make amigurumi because it does not fuzz, and the yarn is very soft.

I also often use Lily Sugar n' Creme yarn when I run out of Patons Grace yarn. In general, I LOVE cotton yarn. This yarn is not as soft as Patons Grace yarn because it is not mercized cotton, but it is very strong and durable. I love this yarn so much. :)

 I like to use Loops an Threads Impeccable Solids yarn. I only get this yarn in two shades, and those shades are lovely shade of hot light pink and a multicolored yarn. I love the color of the pink yarn more because it goes perfectly with a dark or light grey, and I highly recommend that you do not use this yarn when making amigurumi. It fuzzes a lot, and I only use this yarn when making Granny Squares or blankets.

I love to use Red Heart Soft Yarn when making hats and scarfs only because it is super soft. If you want to make a fuzzy amigurumi, this yarn is perfect for that project. I highly recommend that you do not use this yarn when making amigurumi unless you want your amigurumi to be nice and fuzzy.


I hope this post helped a lot! :) Have a wonderful day of Crocheting and Crafting!


❤️Anna❤️

Friday, September 27, 2013

DIY Card Tutorial

Well, I have been crafting for 2 months now, and I am liking it a lot( sorta...)! But aside from crafting, I also love to knit and crochet ( You all probably know that by now... :P). I thought to myself, " Why not  mix crafting and crocheting together?"
 As the solution, I made a card with crocheted hearts on it, and I decided to post a tutorial.(YAY!)

Materials
~2 different types of scrap book paper or construction paper
~ Scissors
~ Glue
~Glue gun
~Yarn and hook (for heart on card.)
~Hole Puncher
~Sharpie or Pen.

          ~Step 1~ With scissors, cute out a neat rectangle from one of the different types of scrapbook paper.
          ~Step 2~ With hole puncher, punch out 2 holes about 1 inch apart from each other in the center of the paper.
          ~Step 3~ With yarn, cut a long strand of yarn and thread it through both holes multiple times until there are two strands 1 inch long hanging out of the holes.
         ~Step 4~ Tie a bow with the 2 hanging strands of yarn.
         ~Step 5~ With the other type of scrapbook paper, cut a long strip of paper that is long enough to wrap around the sides of the rectangle that you cut out from the other type of construction paper.
         ~Step 6~ With the glue, glue part of the strip onto the middle of the rectangle card and glue and fold the sticking out ends around the rectangular card.
         ~Step 7~ Let it dry
         ~Step 8~ Crochet a heart with yarn and hook with this pattern.
         ~Step 9~ With the glue gun, glue the heart onto the center of the strip of scrapbook paper on the card.
         ~Step 10~ With the sharpie or pen, write one of the person's name on one side beside the heart and write the other person's name on the other side beside the heart on the card.( OR if you are making the card for one person, you can write the person's first name on the left side beside the heart, and write their last name of the right side beside the heart. )
       

And voila! You are done! I hope you enjoyed this post. As a wedding gift for the couple, I made them some of my teddy bear keychains!


I also hope that you have a wonderful day of crocheting and crafting!
~Anna~

Tuesday, September 17, 2013

Take Back Tuesday

I made an Elephant keychain!!:) the pattern is super simple and super easy. I didn't make any modifications to the pattern. I used my Clover hook size 2.75mm. I also used Red Heart Super Saver solids in Grey as the color, and I used 6.0 mm safety eyes. Btw, the pattern can be found here: http://lucyravenscar.blogspot.com/2010/02/bazaar-patterns-incy-wincy-elephant.html
      That's it for today! I hope you have a great day of crocheting and crafting! 
Bye!!
~Anna~

Saturday, September 7, 2013

Chunky Infinity Scarf Pattern

Well, it's September!! :) I had a lot of magenta chunky yarn that i never used. I liked the color, but I didn't know what to make with it. Since the fall and winter season is coming soon, I decided to prepare for the cold days!!Since I made the scarf using the chunky yarn, my cowl is super soft and warm. I can't wait to wear it during the winter!

You can wear this scarf in two different ways. I personally like to wear my scarf looped twice over my head. :) 
The pattern is super easy. 
Here it it! 
Materials:

  • 3 balls of chunky yarn 
  • 10mm crochet hook
  • Yarn needle
Pattern
Ch 98
Row 1: in the 3rd ch away from the hook, hdc. Hdc in every ch across. Ch 2 and turn.
Row 2: hdc in every st across. Ch 3 and turn.
Row 3: dc in every st across. Ch 2 and turn.
Row 4&5: hdc in every st across. Ch 2 and turn.
Row 6: dc in every st across. Ch 2 and turn.
Row 7&8: hdc in every st across. Ch 2 and turn
Row 9: dc in every st across.
Row 10&11: hdc in every st across. Ch 2 and turn.
Row 12: dc in every st across
BO.

Finishing.
Sew the ends together to form a loop. Weave in loose ends.

And you're done!! I hope you enjoyed this pattern and post. :) happy crocheting!
Anna out.

Monday, August 26, 2013

Cute Scallop Flower Coaster

A super cute coaster, and it is really fun and easy to make!:)

Pattern can be found here!
Happy crocheting!
Anna out.

Friday, August 23, 2013

Chinese New Year Doll

I already made a Chinese New Year Doll, but I used a 5.5mm crochet hook. This time, I used a 2.00mm crochet hook. For her hair chopsticks, I didn't make the jewels.

I love this picture. :) I placed my doll on top of my favorite plush piggy.

I llloooovvveee how Chinese New Year Doll can stand up by herself. :)

She is really small. Approximately, she is about 5 inches tall.


I didn't make any modifications to the pattern. This doll would make a great gift to any friend. I hope this post helped you know how big Chinese New Year Doll is.

Happy Crocheting!

Anna out.