Showing posts with label wip. Show all posts

Saturday, July 25, 2015

Amigurumi Light from Death Note

I was a big fan of Death Note. I used to read the manga/comics at the library when I was younger. The plot and characters blew my mind. :)


My favourite character in the manga was L who is a detective.(image found at google.com)
Since L is my favourite, I wanted to crochet an amigurumi version of him, but his hair was too spikey and complicated for me to crochet, so I decided to crochet Light who had much easier hair to crochet. :) (image found at google.com)
Before making Light, I sketched him out on a piece of paper:
This was my first sketch of both Light and L, but I changed, Light's sinister look to a cuter look instead:

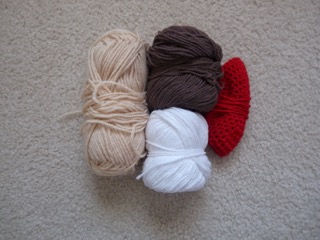
I used tan, white,blue,brown, and red yarn, and my 3.75mm crochet hook to make Light


I started off by making the head:

Then, I attached the eyes

And since I am lazy, I did not want to make Light's head and body separate then sew them together, I crocheted  both the head and body as one big piece.


Next, I made Light's limbs and then sewed them to the body:


Next came the hardest part: the hair. It took me an hour and half to embroider the hair to Light's head, but it was worth it:

With the help of my dad, I made Light's signature red neck tie, and my dad tied it on for me since I do not know how to tie a neck tie. :P

The final step was to make Light's Death Note. First, I cut a rectangle shaped piece of cardboard, then painted it black and wrote "Death Note" on it with white paint:

Then finally, I used a glue gun to glue it to Light's hand: 


Light is complete!! 


I hope you liked this post! :) It has been a very very long time since I posted something on this blog. I hope to post more soon! Maybe I will make L and post him later! :) 

Till next time, Happy Crocheting! 

~Anna

Tuesday, January 28, 2014


I am very excited to introduce a new friend to y'all! Here is a sneak peek of a new amigurumi design! What do you think? The step-by-step blog post and pattern will be coming out very soon this week!  

Saturday, December 28, 2013

Project~Easy Pom Pom Beanie

While I was watching the Wolverine with my dad and brother, I made this super cute hat!! :) I saw it on All About Ami's blog ,and I knew I HAD to make it. :)I made the long thick strip and folded it in half and sewed the side closed. I used my 6.0mm Clover Crochet hook.
Doesn't the hat have such a lovely ribbed pattern? :)
 I love the ribbed look of the hat. :) ❤️❤️


Then, I threaded a long strand of yarn around the circumference of the hat and tightly pulled the string which closed the hole. 
Then, I made a Pom Pom, sewed it to the top of the hat, and my hat was done!!!:) 
I love this hat... :) 
It looks super cute!
I wear this hat a lot. And it goes well with a LOT of my winter scarfs and jackets. :) Keep warm, y'all!!
The pattern can be found on the Lion Brand website, but you need an account to get the pattern. Luckily the registration is free!! :)

Have a great day of crocheting and crafting!! 
❤️anna❤️


Saturday, December 7, 2013

Simple Breezy Slouchy Hat

 Brrr! It's been pretty chilly where I live lately. :) It may even snow(it never snows where i live)! I made so many winter hats and scarfs, but this one turned out to be my favourite hat. I bought 2 balls of Vanna's Choice yarn in two different shades of grey, and I decided to make a beanie. The pattern is super easy and simple, and it can be adjusted easily too!

Materials

  • 2 balls of grey yarn in different shades( I used Vanna's choice yarn in Silver Grey and Charcoal Grey)
  • Size 6.oomm crochet hook( I used my clover hook)
  • Tapestry needle
Hat Band:
With the darker grey yarn:
Ch 8
R1: In the 3rd ch away from the hook, dc. Dc in every ch across.
R2: dc in the back loops only across.
Repeat R2 until the band will fit easily over your head.
BO and sew the ends together.
Hat Body:
With the lighter grey yarn:
Rnd 1: Attach the yarn to the brim of the band, and sc around the band.
Rnd2-20: HDC in every st around.
BO.

Finishing:
Cut a long strand of yarn and thread it through the top of the hat. Pull tightly to close the hole. Weave in loose ends.

And there you have it!! :) 

Have a great day of crocheting and crafting! 

~Anna~
This pattern is an original pattern by Anna S. from Spool of Sunshine(December 2013). Please do not claim this pattern as your own. If you wish to share this pattern, you may link to this pattern but please do not reprint it on your site. You may keep a copy for your own personal use but you may not sell or distribute it, or sell items made from this pattern.

Wednesday, November 27, 2013

DIY Totoro Shirt


I love Totoro. When I looked at my Totoro shoes that I posted here, I thought that it would make a super cute shirt if I added some simple pieces of felt to a casual grey shirt! :)
 I had an ugly grey shirt that I never wore. So, I decided to make that shirt into a Totoro shirt.
Materials

  • White and black felt
  • glue gun and LOTS of glue sticks. 
  • scissors
  • embroidery needle
  • grey yarn
  • Grey shirt
 ~Step 1~ Wash the grey shirt or make sure that the shirt is clean
~Step 2~ With the white felt, cut out a long oval and 2 small circles. ( The sizes of the oval and circles depends on what you think would look best.) 
~Step 3~ With the black felt, cut out a small triangle, 2 small circles that can fit on top of the white circles, and 4 thin long strips. 
~Step 4~ With the needle and grey yarn, embroider 3 upside down v's on the top row. Then embroider 2 upside down v's on the bottom row. 
~Step 5~ With the glue gun, glue the white oval on the shirt 3-5 inches below the neck hole. 
~Step 6~ Then glue the white circles 1-2 inches above the white oval.
~Step 7~ Glue the black circles on top of the white circles. 
~Step 8~ Glue the black triangle in the middle of the eyes. 
~Step 9~ Glue 2 of the black strips below the eyes next to the nose. Repeat for the other 2 strips on the opposite side.
~Step 10~ Let the glue dry

And voila! You're done! I hope you enjoyed this tutorial. 
Have a great day of crocheting and crafting!